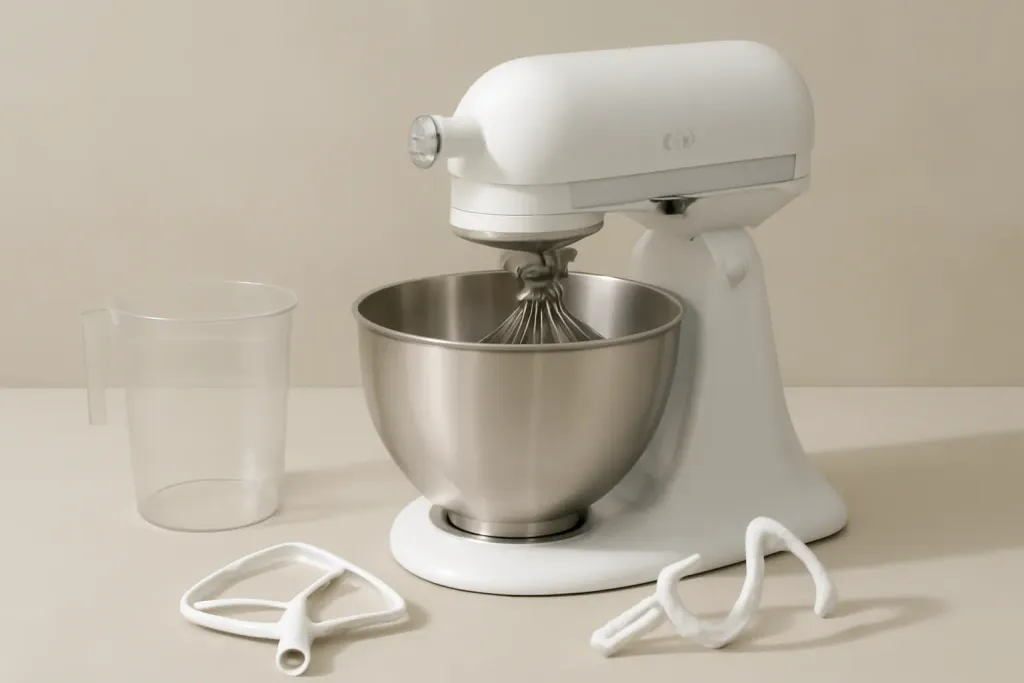
What Stand Mixer Attachments Are For
When shoppers search for stand mixer attachments explained, they usually want a practical overview of how a mixer becomes more versatile. The standard mixing tools handle everyday baking, while optional accessories extend the machine into tasks like pasta making, grinding, slicing, and shredding. Knowing what each attachment is meant to do helps you buy with more confidence and use the mixer more effectively.
It is worth separating the built-in mixing tools from the add-on accessories. The first group is designed for mixing bowls of batter, dough, and whipped mixtures. The second group is more task-specific and often depends on the mixer brand, model, and hub design. That means a feature list can look impressive online, but compatibility matters more than a long accessory catalog.
For most households, the best starting point is to learn the core tools and then decide whether a specialty attachment fits a regular cooking habit. A good rule is simple: buy for the recipes you actually make, not for the idea of having every possible accessory.
- Core tools handle mixing, beating, whipping, and kneading
- Optional accessories expand the mixer into prep and shaping tasks
- Compatibility should be checked before buying any add-on
The Three Core Tools Included With Most Mixers
Most stand mixers come with three standard attachments, and these cover a large share of home baking. Each one has a distinct shape because each one handles a different texture. Choosing the right attachment can improve mixing consistency and reduce the chance of overworking a recipe.
The flat beater, sometimes called a paddle, is the all-purpose choice. It is commonly used for cake batter, cookie dough, frosting, mashed-style mixtures, and creaming butter with sugar. Its shape is designed to combine ingredients evenly without introducing too much air.
The wire whisk is intended for aeration. It is commonly used for whipped cream, egg whites, and other mixtures where volume and lightness matter. Because it moves air through the ingredients efficiently, it is usually the right tool when the goal is a lighter texture rather than a dense one.
The dough hook is made for thicker, elastic doughs. It is typically used for bread dough, pizza dough, and similar yeast doughs that benefit from kneading. It can reduce manual kneading, but it is still important to follow recipe guidance on speed and time rather than assuming the mixer can run indefinitely.
- Flat beater: all-purpose mixing
- Wire whisk: whipping and aerating
- Dough hook: kneading yeast doughs
How to Match the Attachment to the Task
Many mixing problems come from using the wrong tool for the texture. A whisk can add too much air to some batters, while a dough hook may not combine a softer mixture evenly. In practice, the best results come from matching attachment shape to recipe structure.
Use the flat beater for medium-weight mixtures that need thorough blending. That includes many cake batters, brownie batters, butter-sugar creaming, and other recipes that should be mixed until just combined. If a recipe is meant to stay relatively dense, the paddle-style attachment is usually the first option to consider.
Use the whisk when a recipe depends on volume. Egg whites, cream, and certain light batters benefit from the whisk’s ability to incorporate air. Bowl size and fill level matter here, since overfilling can lead to splashing or uneven whipping.
Use the dough hook for dough that needs folding, stretching, and kneading. Bread dough and enriched doughs are the common examples. Because dough can climb the hook or gather around the center post, it is smart to monitor the mixer while it runs and stop it if the load seems too heavy.
- Dense or medium batters: flat beater
- Light and airy mixtures: wire whisk
- Elastic doughs: dough hook
- Choose by texture, not just recipe name
Specialty Attachments and Accessories
Optional stand mixer accessories can add functions beyond mixing, but they are best viewed as task-specific tools. For some kitchens, one well-chosen accessory can be more useful than a separate countertop appliance. For others, the core tools are enough. The right decision depends on how often you would actually use the add-on.
Common specialty options include pasta rollers and cutters, food grinders, slicers, shredders, spiralizers, juicers, grain mills, and ice cream bowls. Not every brand offers the same lineup, and some accessories are limited to certain product families. A mixer may have a hub for powered attachments, while another may support only a narrower set of add-ons.
Pasta accessories are popular because they help roll and cut dough into uniform shapes, though they still require hands-on feeding and setup. Grinder attachments are often chosen for coarse grinding tasks or breadcrumbs, provided the manufacturer says the accessory is intended for that use. Slicers and shredders can save repetitive prep time, while spiralizers appeal to cooks who want consistent vegetable shapes for specific recipes.
These accessories can be convenient, but they do not replace every appliance or every prep method. The most practical approach is to choose one specialty attachment that matches a frequent cooking task rather than collecting several that rarely leave the box.
- Pasta rollers and cutters for sheets and noodles
- Grinders for approved grinding tasks
- Slicers and shredders for repetitive prep
- Spiralizers for shaped vegetable cuts
- Other add-ons vary by brand and model
Browse our recommended products
Our featured picks refresh periodically. While we update them, our editorial guides can help you find the right pick.
See our guidesCompatibility and Fit: What to Check Before Buying
Compatibility is one of the most important parts of any guide to stand mixer attachments explained. Two mixers can look similar and still use different fittings, hubs, or accessory systems. That is why the model number and manufacturer documentation should be the first place you look before adding anything to a cart.
Some mixers use a front or top accessory hub, while others rely on a different connection style or a dedicated drive system. The fit may also depend on whether the machine is tilt-head or bowl-lift, or on which generation of the product line you own. Online listings may say “compatible,” but the product manual or brand compatibility chart is usually the most reliable reference.
It also helps to separate standard mixing attachments from powered accessories. A whisk, beater, or dough hook is not the same as a hub-driven pasta cutter or grinder. Parts from different systems should not be mixed unless the manufacturer specifically says they work together.
If you are uncertain, compare the accessory listing with your exact model identifier before you order. That small step can prevent a return and save time, especially with bulky add-ons that are inconvenient to ship back.
- Confirm the exact mixer model number
- Check whether the mixer is tilt-head or bowl-lift, if relevant
- Verify the attachment hub or connection type
- Use the brand’s compatibility chart as the main reference
Materials, Cleaning, and Storage
Attachments tend to work better over time when they are cleaned and stored carefully. Materials vary, so the correct care method should always follow the manufacturer’s instructions. Some attachments are metal, some have coated surfaces, and some use plastic parts that can be more sensitive to heat or harsh detergents.
In general, it helps to remove food residue soon after use before it dries on the surface. A soft brush or nonabrasive sponge can be useful for grooves, joints, or other detailed areas. If a part is labeled dishwasher-safe, that should be stated clearly by the manufacturer; if not, handwashing is usually the more conservative option.
Be gentle with finishes and coatings. Aggressive scrubbing can wear surfaces down over time even if the attachment still functions. After washing, dry the pieces fully before putting them away so moisture does not linger in seams, crevices, or metal parts.
Storage matters too. Keeping attachments in one drawer, bin, or case makes them easier to find and less likely to be bent or misplaced. If your mixer includes a storage box or designated organizer, using it can help keep the complete set together.
- Follow the manufacturer’s cleaning instructions first
- Use nonabrasive tools whenever possible
- Dry attachments completely before storing
- Keep compatible parts organized together
How to Choose the Right Set for Your Kitchen
The best attachment set depends on your cooking habits. Someone who bakes several times a week may get the most value from the three core tools, plus one specialty accessory. Someone who makes bread often may care more about the dough hook, while a pasta-focused cook may prefer rollers and cutters. There is no universal best bundle.
A good way to decide is to look at what you already make. If cookies, cakes, and quick breads are your mainstays, the flat beater and whisk may cover much of your routine, with the dough hook used for occasional yeast doughs. If bread is a regular project, the dough hook becomes a more important tool. If you want to expand beyond mixing, choose an accessory that supports a frequent task rather than a novelty.
Convenience also matters. Some attachments attach and remove quickly, while others take extra setup or cleaning time. A tool that is easy to store and simple to clean often gets used more often than a more elaborate option. In many kitchens, the most useful purchase is the one that fits existing habits without adding much friction.
For that reason, a cautious buying plan often works best: start with the core attachments, then add one specialty tool only if it matches a regular recipe or prep step.
- Frequent baking: start with the core trio
- Frequent bread making: prioritize the dough hook
- Frequent pasta making: consider pasta accessories
- Frequent prep work: look at slicers or shredders
Using Attachments Correctly and Avoiding Common Mistakes
Correct use is mostly about fit, speed, and the type of mixture in the bowl. Even a stable mixer can run into trouble if the wrong attachment is installed or the bowl is overloaded. A sensible starting point is to begin on a low speed, then increase only as the recipe calls for it.
Keep hands, utensils, and loose clothing away from moving parts while the machine is running. Stop the mixer before scraping the bowl or swapping attachments. That small habit reduces the chance of accidents and makes the process easier to manage.
Do not force an attachment into place. If it does not seat correctly, stop and check alignment, locking points, and compatibility rather than pushing harder. A secure fit should feel intentional and stable. If the mixer sounds strained or the mixture is climbing too high, pause and reassess the load instead of trying to power through.
For specialty accessories, use only the parts and procedures listed by the manufacturer. Because hub systems and fittings vary, combining components across brands is not a good idea unless the documentation specifically allows it.
- Start at low speed and increase gradually
- Stop the mixer before changing attachments
- Do not force incompatible parts together
- Follow the manufacturer’s load and use guidance